Editor's Choice Forums

Using Virtual Machines on your PC

What is a Virtual Machine In it’s most basic form, a program that pretends to be a computer. What are Virtual Machines “for” They are used to partition off resources within your machine. Say for example you wanted to run some Windows pro...

What is a Virtual Machine

In it’s most basic form, a program that pretends to be a computer.

What are Virtual Machines “for”

They are used to partition off resources within your machine. Say for example you wanted to run some Windows programs on your Linux Workstation. You can allocate some memory and storage to a Virtual Machine, then install Windows onto the storage. Then you can boot Windows effectively as an application under Linux. The virtual (Windows) machine will be constrained in terms of it’s access to and use of memory and disk, so beyond that it won’t be able to adversely effect your physical Linux installation. I’m using Windows as an example, technically you can run most PC based operating systems inside Virtual machines, whether it’s, Linux, Windows, OpenBSD etc.

But “why” ?

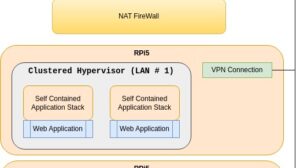
There are the obvious, reasons as above (if you need to run an entirely different Operating System) but many other too. For example I need to be a part of a global VPN for some of the work I do, however I don’t want to potentially give other machines remote access to my workstation. (and if I joined my machine to the VPN, it would be on the same local network as many other remote machines, which would be a serious security risk) The solution; to create a Virtual Machine, then join it to the VPN. As this machine is completely partitioned off from my physical machine, even if the Virtual Machine is compromised then my physical machine should remain uncompromised. The same goes for development work. When programming you end up continually downloading and running 3rd party scripts and libraries which historically you’ve just had to trust weren’t some sort of malware. These days that trust is pretty much gone and what are termed supply chain attacks are rife. Essentially hackers compromise well-known / trusted libraries, so when unsuspecting programmers include them in their code and run their first tests, their machine is immediately compromised. Anyone still developing on their own machine? (stop now!) For example I have a Virtual Machine called dev, all my development work takes place on dev. If you use vscode, when you start up you can tell it to connect to another (virtual) machine via ssh. From that point on you will be developing using an IDE on your machine, but with your programs (and 3rd party libraries) sat in a virtual machine. When you test your code, you do so via a terminal / ssh session inside the Virtual Machine, so you never run potentially unsafe new code on your own physical machine.

Getting Started

First of all we need a tool to manage Virtual Machines, of which there are a number. In this instance I’m going to be using VirtManager, so on Ubuntu you will need;
sudo apt install virt-manager
Once installed you should have a new application available in the menus called “Virtual Machine Manager”. If you open this up you should get a window that lists all of the Virtual Machines configured on your system. If you’ve not set any up then the window will be blank, if not you will see one row per virtual machine, then some optional thumbnail charts to show machine activity. So on my machine for example; vm-1

Creating a new Virtual Machine

As an example I’m going to create a virtual machine from an Installer held on a USB Key. (if you want such a key, you can order one here!) First, click on File → New Virtual Machine;
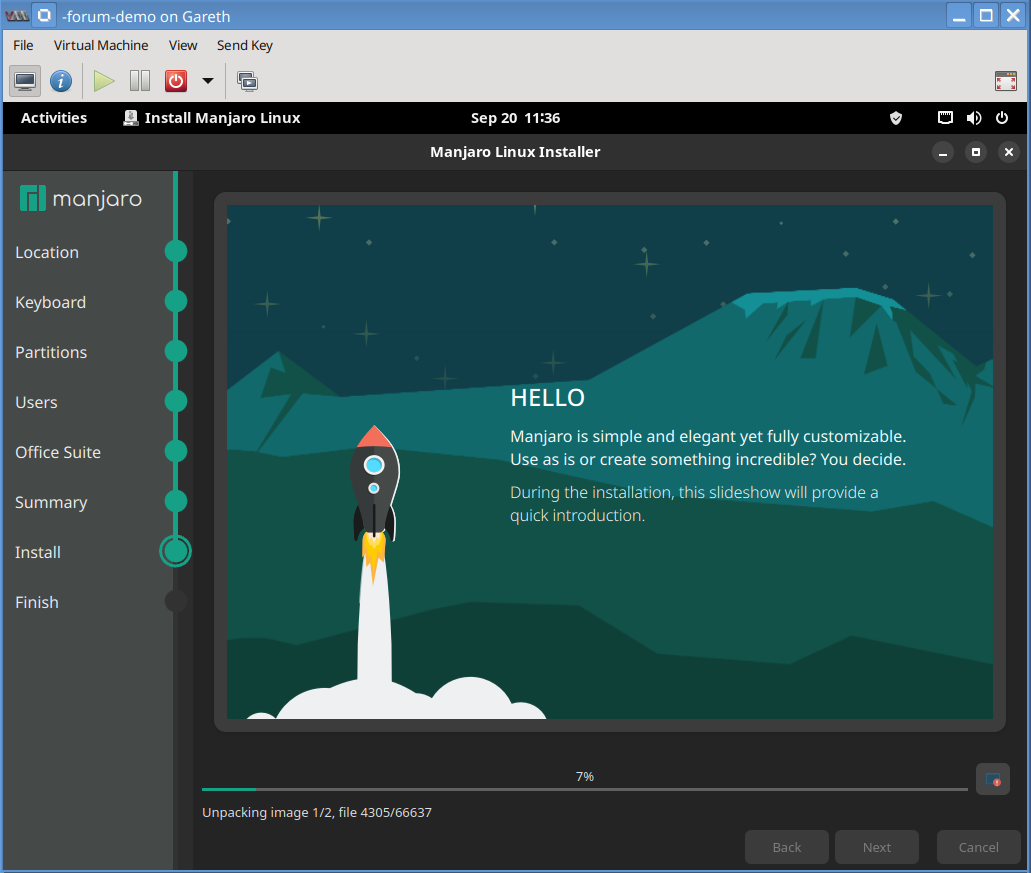
 Select manual install, then click Forward. Now it will ask about the Operating System you are looking to install. This is not an absolute reference, it’s just looking for hints about how it can optimise itself depending on your choice. In this case, start typing Generic and select “Generic Linux 2022”. Then click Forward. Now it’s going to ask you to select how much memory and cpu to allocate to the Virtual Machine. CPU is shared with your main machine, so generally allocate as many cores as you wish, it will share CPU resources like any other application. Memory on the other hand is a dedicated pre-allocated chunk that your workstation will lose access to. For example if you launch a Virtual Machine with 4096Mb (4G) allocated to it, if your workstation had 16G before launching, you will be down to 12Gb when the Virtual Machine is running. Next you need to allocate some storage space. By default this storage will be sparse, which means that you’re selecting a maximum size rather than a pre-allocation. If you select 25G, then install Ubuntu and the Ubuntu installation only takes 2.5G, then you will only have consumed 2.5G of storage on your Workstation. Assuming your machine isn’t completely out of disk space, just click forward. Next you will be prompted for a name, I’m going to use forum-demo. In this instance, as it’s a manual install, you need to click on the customise tick box, then click on finish. This bit might seem a little more involved, but it’s relatively straight-forward. Make sure at this point your USB Key is plugged into your machine. All we need to do is to tell the virtual machine that our installation is on our USB Key, and that we want it to boot from that usb key. So if we click on “Add Hardware” in the bottom left; And from this menu select USB Host Device, then select your USB Key from the available list of devices; And click Finish. Now click on Boot Options; You will need to unselect the VirtIO Disk 1 entry and select USB …, the click Apply, and we should be good to go. Just click on Begin Installation listed in the far top left. All being well ( :slight_smile: ) you should now see the USB Key boot screen. In this instance I’m using a smaller / limited 32G key, the standard keys I make are twice the size and have twice the number of images available.

Installing Manjaro

In this case I’m going to try Manjaro. The initial menu will prompt me for how I want to Boot Manjaro, in this instance I’m just hitting return to “Boot with Open Source Drivers”. There will be a bit of a pause while it reads from the USB Key then; In this instance we hit the Manjaro installer screen and I’m going to hit Launch Installer. The installer is relatively self explanatory so I won’t screen shot every stage. First I’m selecting “British English” then clicking Next. My default timezone is showing as London, which is close enough, so I’m hitting Next again. For keyboards, default looks to be the closest mapping, so I select default them click Next.

Disk partitioning

  • You need to select the disk you are going to install to. At the top of the screen select vda
  • At the bottom of the screen, select where to write the master boot records, select vda
IF YOU FAILED TO DO EITHER OF THESE THINGS, IT WILL OVERWRITE YOUR USB KEY Your key will have a device name of sda, if you see sda anywhere on the screen, don’t continue. You will note that although your Virtual machine is partitioned off from your main system, you can give it access to devices such as USB keys. Any devices the Virtual Machine is given access to can be written to by the Virtual Machine! Note; Other distro’s might look a little different, but you should always check both the device you’re installing to AND the location it’s going to write the bootloader, if you wish to preserve your USB Key. (drives you do not want to mess with will generally be sd…, your virtual disk will be vd… Then just click Next.

User details

So this is the one bit you need to be a little careful with. You will be asked to create a new user. You will need this once the installation is finished in order to log in. If you forget the password you are about to enter, you will likely be repeating this process (!) In this case Manjaro unlike Ubuntu is asking some administrator questions, so I’m just ticking the box that says “Use the same password for the administrator account”, which means I don’t need to remember two passwords. Next it’s asking me which Office suite I want, I’m selecting LibreOffice. Now it’s confirmation time, I’m hitting Install, at this point make sure the devices listed at the foot of the screen all say /dev/vda… (and not /dev/sda) Their progress bar is accompanied by a rocket taking off, which is kinda cool :slight_smile: And now we wait … installation typically takes a few minutes. One of the handy features of working with virtual machines is that they can be paused at any point (note the pause button on the toolbar) and screenshots, well, you’re just grabbing part of your workstation screen.

Installation Complete

Just one final tweak. After installing, we’re returned to the installer screen, so we’ll need to shutdown, I’m using the red button on the toolbar → shutdown. When the screen clears (no console when the Virtual Machine is stopped) I’m clicking on the blue “I” icon on the toolbar to access the Virtual machine configuration. Then click on *USB … to select our USB Key, then click on Remove. Then check in boot options, the default boot should have reverted to VirtIO Disk 1, which is your Virtual Machine’s new virtual hard drive. If not, select VirtIO Disk 1 as the first boot option, then click Apply. Now you can click on the first icon on the toolbar (the monitor icon), then click the green play icon to start your new Virtual Machine. Hopefully you should see something like this; I notice with recent versions of the software that drives the virtual console (called spice) it’s become good enough to reliably watch YouTube video’s on the Virtual Desktop. (i.e. the graphical desktop running inside the virtual machine) I’d be interested to hear how well recent versions of Windows work if anyone tries it.
Note; you maybe thinking after reading this; “why is he soooo pedantic about the sda / vda thing and not accidentally overwriting your USB Key”. The answer is; “because it’s easily done!” :flushed:
4 posts - 2 participants Read full topic
Tags

About the author

Mad Penguin

Mad Penguin is a Linux forum administrator and moderator.